Note: Please read the article carefully before proceeding! If in the process of using you encounter any errors, such as broken download links, slow loading blog, or not being able to access a certain page on the blog … then please inform me through the Contact page. Thanks!
As the most popular computer operating system today, it is not difficult to understand when Windows 10 is always targeted by bad guys and black hat hackers.
It can be said that Windows 10 is the most attacked target in the world, especially after the death of Windows 7, the popularity of Windows 10 has increased even more.
Many people mistakenly think that Windows 10 is not good security, so many vulnerabilities have been discovered, but it is not. It's just too common, other operating systems are not popular enough and not really potential for hackers to touch them.
Because of its popularity, Windows 10 is equipped with many features, as well as tools to support security, both in Offline and Online environments.
The most noticeable thing is that Windows 10 offers users a lot of options for logging in, such as using a PIN, security code, Windows Hello, … and in this article, I will guide teach you how to turn on the Secure Sign-in feature to increase the security on Windows 10!
Read more:
I. Turn off / on the Secure Sign-in feature on Windows 10
Secure Sign-in is an extended feature on the login screen of Windows 10, it does not prevent anyone from logging into Windows 10 if they have your Administrator account information.
Instead, Secure Sign-in will only display the account password, login PIN code when they press the correct key combination that you have preset, such as Ctrl + Alt + Del. After they have pressed the correct set of shortcut keys, they will be able to log in as usual.
Accordingly, this feature was created to prevent malicious code named thwart malware. This malware will run in the background and can pretend to be the login screen of Windows 10 for the purpose of recording your login information. It works like a keylogger!
Because most software do not have the right to use Ctrl + Alt + Del so we can combat this by using Ctrl + Alt + Del to unlock the Secure Sign-In.
Okay, right now I will share with you 3 ways to activate using this Secure Sign-in feature, you can apply in any way.
Method # 1: Use netplwiz command to enable or disable Secure Sign-In
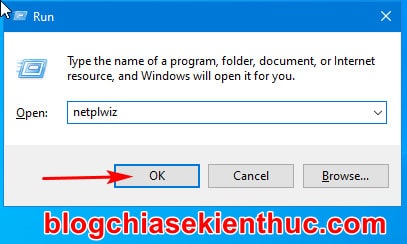
+ Step 1: First, open the Run dialog box using the key combination Windows + R => and then enter the command netplwiz => and then press OK.
Alternatively, you can also use Windows Search and enter keywords netplwiz to run this tool!
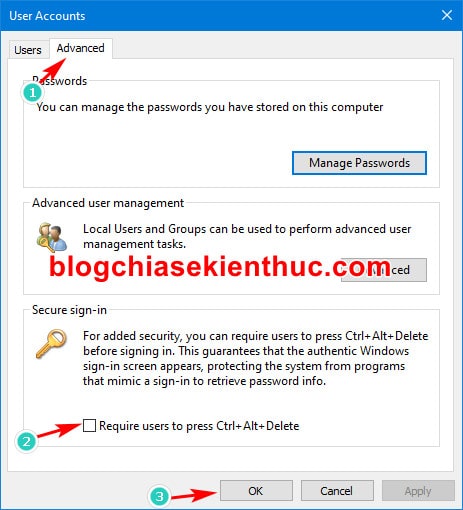
+ Step 2: Installation window User Accounts like this will appear on your screen.
Here, switch to the tab Advanced => and find and tick the line Require users to press Ctrl + Alt + Del under section Secure Sign-In => and press OK to complete the setup.
That's it, the Secure Sign-In feature on Windows 10 has been activated.
Method # 2: Enable Secure Sign-In on Windows 10 using Registry
Perform:
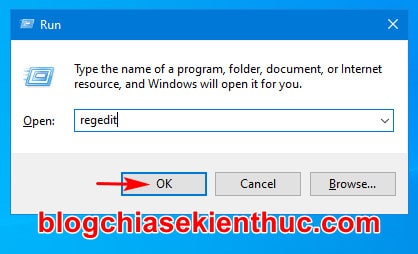
+ Step 1: First open the Run dialog box (Windows + R) => and enter the command line regedit => and then press OK to access the Registry Editor on Windows.
Note: You should back-up the entire Registry of Windows 10 to be able to recover if you accidentally manipulate offline!
+ Step 2: You can access the following link using the left navigation bar or paste this address in the address bar for quick access is also possible (Hint: How to quickly access a Regedit link)
Computer / HKEY_LOCAL_MACHINE SOFTWARE Microsoft / Windows NT CurrentVersion
+ Step 3: After you have accessed the correct path, then in the key CurrentVersion, You find and access the subkey Winlogon.
Go on, in the subkey Winlogon This => you find and double click on the key named DisableCad like in the image below to reset its value.
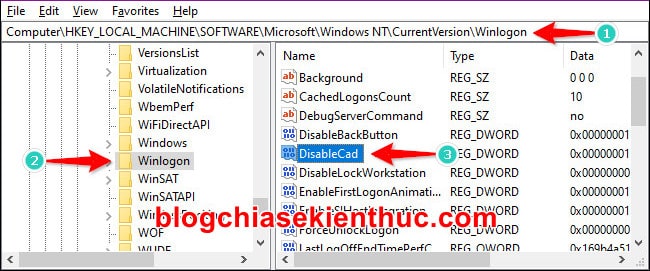
Note that you probably won't find this key in the Registry!
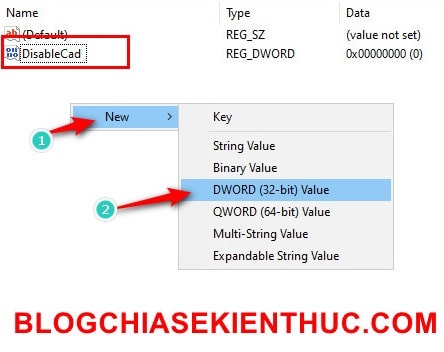
But don't worry, if you can't find it, you can right-click on it Winlogon => Select New => select DWORD (32-bit) Value and create a new key and name it DisableCad then make the price adjustment as below.

+ Step 4: In the box Value Data Please enter:
- Number
0to turn on function ofSecure Sign-In(press Ctrl + Alt + Del) - And the number
1to turn this off. - UMBRELLA
Baseyou should keep beingHexadecimal=> and then pressOKto complete the setup.
=> Please restart Windows 10 for the changes in this Registry to take effect, always remember this home!
Method # 3: Use the Local Security Policy Editor to enable or disable Secure Sign-In
This name sounds quite strange, right? At first I thought I was mistaken but it turned out not to be.
Local Security is where you can set policies related to the login, rights and privileges of accounts, trusted domains, etc., in general, about the security settings of Windows.
To access the Local Security Policy Editor is also very simple, we can also use the Run dialog and Windows Search as well.
Perform:
+ Step 1: First, open the Run dialog box (Windows + R) => then enter the command secpol.msc => and then press OK to open Local Security Policy on Windows 10.

+ Step 2: Both the same name and the same interface of Local Group Policy Editor, so it is not too difficult for me to be familiar with this tool.
Back to the article, click on the section Local Policies => and then click Security Options in the right navigation bar.
Looking to the right, you can scroll down a bit to see the settings immediately Do no require : CTRL + ALT + DEL is in state Not Defined (Not configured)
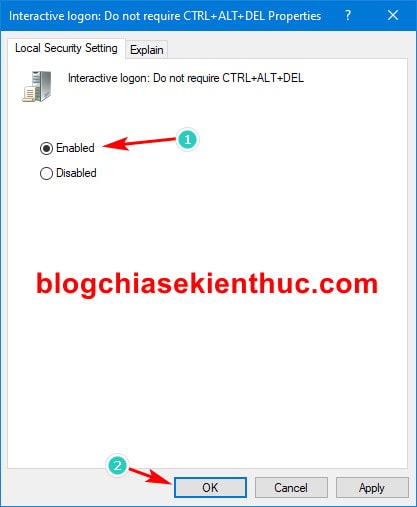
=> Please double-click on this setting to begin setting up the feature Secure Sign-in.

+ Step 3: In the new setup window appears => at the tab Local Security Settings => you tick the line Enabled => and then press OK => So the Secure Sign-in setup process on Windows 10 has completed.
II. Epilogue
So I have just instructed you 3 ways to turn on the Secure Sign-IN feature on Windows 10, Bypass malware types, prevent logins from being stolen on Windows 10 and then.
Note that only use 1 of the 3 ways I introduced above to turn it on, will not cause conflicts. Hopefully this article will be of help to you. Good luck !
CTV: Nguyen Thanh Tung – Blogchiasekienthuc.com
Note: Was this article helpful to you? Do not forget to rate the article, like and share it with your friends and relatives!