Surely most of you already know what Page Level Ads from AdSense are. The original name of the overlay ad, this type only appears on mobile devices, aka cellphones. This is because Google understands that every day users prefer to access the internet via cellphones, not on computers or laptops anymore.
The increasing number of mobile users compared to desktop is an opportunity in itself. We must be able to use it to increase revenue from AdSense by placing Page Level Ads on the blog.
About Auto Ads
Page Level Ads is part of Auto Ads or automatic ads. This means that we only need to install a single code and later the ad will appear in many places according to Google's wishes. Its position is maximized in a potential place. Automatic ads are grouped into two, namely:
- In-page advertisements
consist of widely familiar formats, namely text & display, in-feed , in-article, and matched content. - Overlay ad
This type will appear covering all or part of the content. Visitors still have the power to hide or delete them if they feel too annoying. Well, this overlay ad is better known as Page Level Ads . The definition is clear, right? In this tutorial, overlay ads will be referred to as Page Level Ads for easier understanding.- This Anchor
Format is most famous among publishers because of its striking location, which is sticky in the body of the blog. By default, the position hovers at the top. But you can also change its position to the bottom with safe modification techniques and don't break the rules. The method will be discussed in the final paragraph. - This Vignette
Format will be displayed in full until it covers the screen for a few seconds when opening a new page while still having the close button.
- This Anchor
How to Add Page Level Ads
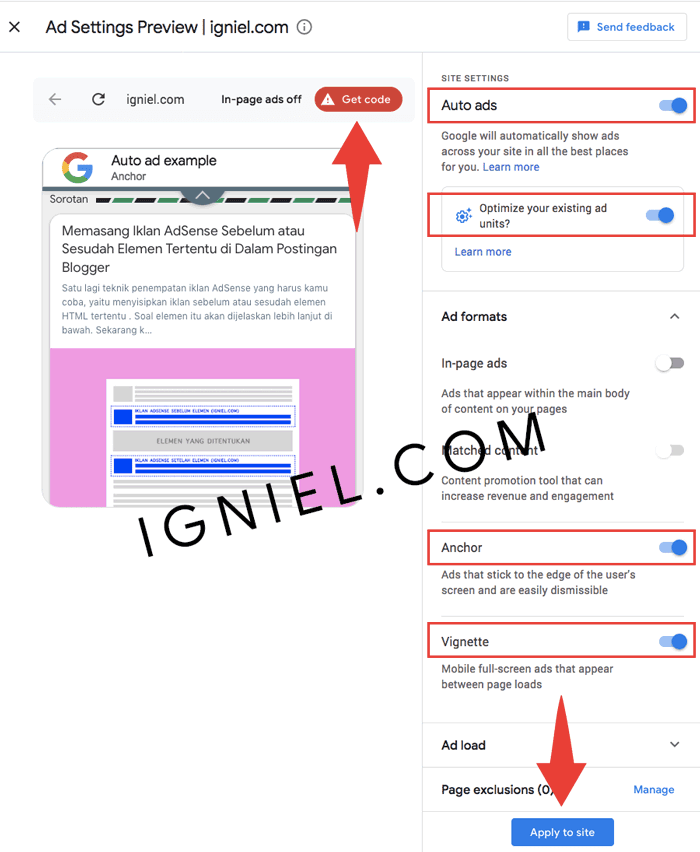
In this tutorial, I will only enable two formats, namely Anchor and Vignette. I chose to deactivate others because in my experience it even made the blog layout messy because its position appeared arbitrarily depending on Google's wishes. If you want to install it go ahead, just activate it.
- Enter the AdSense website and log in using each account.
- Enter the menu
Ads›Overview. - See there is a box containing the blog address. Click edit in the form
ikon pensilon the right.
 Do these settings:
 -
- Activate
Auto ads - Activate
Optimize your existing ad units? - In section Ad format, activate these two features:
AnchorandVignette
- Activate
- Click the button Get code. Copy and place the code ABOVE
</head>on the blog template. - After all is done, click the button Apply to site.
- It will take at least 1 hour for ads to appear on the blog. So just be patient while relaxing coffee.

This is the code that we got:
<script data-ad-client="ca-pub-xxxxxxxxxxxxxxxx" async src="https://pagead2.googlesyndication.com/pagead/js/adsbygoogle.js"></script>If an error occurs while installing the code, change that be marked be like this:
<script data-ad-client="ca-pub-xxxxxxxxxxxxxxxx" async="async" src="https://pagead2.googlesyndication.com/pagead/js/adsbygoogle.js"></script>Changing Position of Floating Page Level Ads to Below
As previously explained, the AdSense ad position with an anchor format will appear hovering at the top of the screen. If you want to change it so that it appears at the bottom, you have to make a few modifications to the ad code.
Delete the code that was installed in the blog template and replace it with this code:
<script async="async" src="https://pagead2.googlesyndication.com/pagead/js/adsbygoogle.js"></script>
<script>
  (adsbygoogle = window.adsbygoogle || []).push({
    google_ad_client: "ca-pub-xxxxxxxxxxxxxxxx",
    enable_page_level_ads: true,
    overlays: {bottom: true}
  });
</script>
Please note that this is a modification permitted by Google and does not violate at all. If one day you change your mind and want to return to display on the screen, you can simply delete that codebe marked. No need to bother changing it to the initial code.